Preparing Your Body for Birthing Positions
Let me begin by saying. Hello! Welcome!
I am going to bet that if you are reading this you are pregnant or someone you care for is pregnant. This blog post is all about preparing your body for birth, however, it is so important that you know that birth is natural (even if you get a c section).
By natural, I mean that your body is incredibly intelligent and you are going to birth regardless of what you do to prepare. As the birthing parent, it is important to trust in yourself, your support team, and the process. All that I have to share with you today will not make or break your birthing experience, it will simply support you during this process. As you read on I hope that you take time to reflect on each of these points to imagine how they could support you in your process.
In preparing your body for birth there are a few key elements to your practice. Starting with stretching to only 40%, build awareness, pelvic breathing and lastly strengthening and lengthening the specific areas.
Why Stretch to only 40%?
Stretching to 40% is important during pregnancy because as the days get closer and closer to birth, your body secretes a hormone called relaxin. This hormone supports your pelvis in shifting to make space for babies entrance into the world. It also means that it is important to use caution as you stretch to ensure the health of your muscles and joints. You might be asking yourself, “How do I know I am stretching to only 40%?”
If you are curious and want to try experimenting you can try stretching your forearms:
- Gently pull your fingers back as far as you can, that is 100%
- Try to ease off to about half strength, and then a little more
- Try it all again with your other hand
- Next, try slowly pulling your hand back until you have reached nearly 40%
- Remember that experience and apply it to all of your future stretching, slowly, mindfully easing in
 What does awareness have to do with anything?
Building awareness (also known as mindfulness), is so important when it comes to preparing for birth. When we frequently tune into our sensations and name them we can better express what we need. During birth, that might mean asking for additional support or expressing how a birthing position is feeling.
This skill is important postnatally as well. Helping Hands Doula has tons of additional information about what to expect and when to ask for help. This ability to turn inwards, notice your own sensations and needs will help you on your journey as the birthing parent or as a caregiver. It is certainly common for women to experience the ‘baby blues’ or postpartum depression. Having mindfulness as a daily tool and skill that you have already developed can be helpful in noticing signs within yourself. In the same way, your mindfulness practice can help you notice the amazing recovery journey that the body is on, and all of the small joys that can happen in a day.
What is the deal with Pelvic Breathing?
Pelvic breathing has been shown to reduce tearing during birth as well as support in healing after birth. During birth, learning to relax your pelvic floor can be so important during the birthing process.
You may be thinking, well I’m having a c section so I can skip this part, right? Nope!
Pelvic breathing is incredible for absolutely everyone, regardless of gender! It is extra helpful for birthing parents, and some additional
benefits that they will likely receive from practicing pelvic breathing, however everyone who practices pelvic breathing will benefit. When pelvic breathing is practiced the whole torso is involved. Think about your abdomen as a container, the pelvic floor is the bottom, the diaphragm is the lid. The diaphragm is this dome shaped muscle that moves with our breath. Most of our internal organs sit in between the pelvic floor and the diaphragm. You can think of our skin, connective tissue and muscles that make up our torso as the sides of this container. One last thing to remember, we are mostly water. You can’t squish water, it just reshapes. So imagine your container and suddenly… the lungs (who are above your lid, the diaphragm) expand, they push the lid down!
Pelvic breathing is when the bottom of the container relaxes and allows for there to be movement and ‘reshaping’.
As you exhale the air is released from the lungs and the diaphragm lifts, allowing for the pelvic floor to gently contract upwards. It is actually how we breathe from birth. When you learn pelvic breathing, you are simply returning to the way you breathed as an infant.
Let’s Practice!
Overview:
- Body Scan & Self Check In
- Pelvic Breathing
- Strengthening & Lengthening
- Down Dog with a wall or chair
- Single leg extension for strengthening
- Pelvic tilts for mobility
- Spinal waves
- 45* lunge pulses
- Integrate Pelvic Breathing
- Ending with Pelvic Breathing, a Body Scan & Self Check In\
- Down Dog with a wall or chair
Recommend Props:
| Yoga Props | Suggested Alternatives |
| Yoga Mat | Folded up Blanket or Comfy Mat |
| Yoga Bolsters | Firm Pillows or Blankets/Towels Rolled into Cylinders |
| Blanket | Blanket, towel, or sweaters |
| Chair | Couch, Bed or Counter Top |
Body Scan & Self Check In
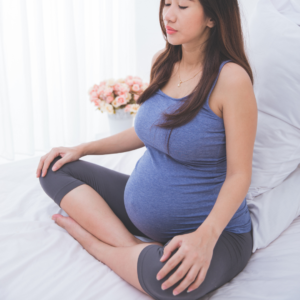
- I recommend starting in a comfortable seated position. If it is available to you, kneeling with pillows in between your legs for support. The more pillows, the higher the hips, the less of a bend in your knees.
- Allow yourself a moment to notice all parts of your body that are touching the floor or perhaps chair. Scan the body and notice how many different textures you can feel right now (Air on your skin, clothing, hair, floor etc.). Next, turn your mental gaze inwards and notice all the sensations that you can feel right now. Some areas may be tense, some relaxed and other difficult to notice all together. Notice all sensation with curiosity, letting go of any judgements.
Pelvic Breathing
- Begin by noticing your natural breath. Perhaps tuning into the sensation of the inhale as it enters your nose follow that sensation to the back of your throat, down into your body. Notice the first signs of the exhale, chest falling, the tickling of the air at the back of the throat as it moves out the nose to the upper lip. Continue for 1 – 2 minutes.
- Next, encourage each breath to be a little longer, a little smoother, a little softer than the one before. Continue for 1 – 2 minutes.
- Continuing to breathe, guide your awareness first to your low bellow, below your belly button. Allowing for this area to relax and soften. Take about five breaths this way.
- Next, guide your awareness to your pelvic floor. Perhaps you can relax your pelvic floor as you inhale. If you are sitting on a pillow or bolster you might even feel your pelvic floor gently press into your prop. As you exhale very gently encourage a drawing inwards of the belly button and a drawing upwards of the pelvic floor. Exhaling, expanding the belly & pelvic floor, letting go of all tension. Breathing out encouraging the drawing inward and upward with an engagement of about 10% of your strength. Continue in this way for 3 – 5 minutes
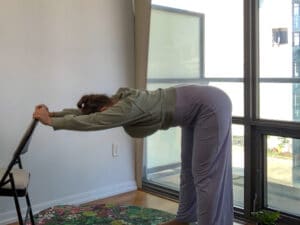 Down Dog with a Chair
- With the chair in front of you, step back arms length from the chair, widen your stance. Bringing your feet a bit wider than hip distance. Allow your feet to be parallel, toes facing forward.
- Guide your hands onto the back of the chair
- Bend at your knees and hinge from the hips to guide your chest to be parallel with the ground, creating a 90* angle in your hips.
- Allow for the chest to melt towards the ground.
- From here you can play, bending one leg and straightening the other. Bending the knees even more to guide your tail bone towards the ceiling.
- For pelvic tilts, begin my rounding your low back by tucking your tail bone underneath you. Next rotate in the exact opposite direction by bending your knees and arching the back to tilt the tailbone up towards the ceiling. Repeat several times. It’s always great to turn on your favourite song and jam out with your pelvic tilts alternatively, set a 1 – 3 minute timer.
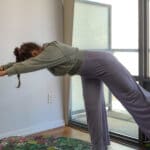
- As a strengthened, extend one leg backwards by sliding your toes across the floor. Here you are stabilizing through your standing legand starting the activate your back. If you are wanting to go a little further, allow the opposite hand to become light. For example, if your left leg is extended, allow the right hand to become light on the chair. The opposite arm and leg work best for strengthening the erector spinae muscles on the back.
- Stay with this extension for three breaths, and then switch sides. Repeat 3 – 5 times.
- As you hold you might tune into the sensation and ask yourself, “which muscle do I feel active here?”
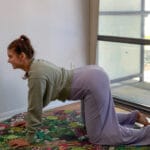 Spinal Waves
- From Hands and knees begin to arch your back by extending your tail bone and head upwards, the belly button towards the ground. This is spinal extension.
- Now, the other direction. Press your hands firmly into the ground and round your spine by tucking tailbone under and head draws down.
- Allowing for the middle of the spine to lift up towards the ceiling. This is spinal flexion.
- Continue to move between spinal extension and flexion. If you are curious about it, you might
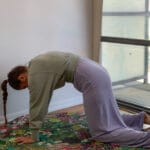 see if you can notice each sensation as it occurs.
 - Feel free to play here by starting the movement all from the tailbone or by experimenting with intuitive movements.
- Allowing yourself to move in a way that feels good in your body.
45* Lunges with a Chair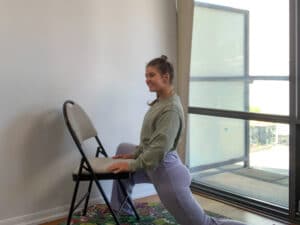
- Have a chair in front of you with the seat facing you.
- From a hands and knees position, hold onto the seat on the chair and place your right foot on and angle beside the chair. Your body should be in a lunge like position.
- With your hands on the chair gently allow your hips to melt forward towards the chair. As You exhale, return to your starting position.
- Continue to breathe and pulse with your breath.
- Allow your breath to be the guide.
- If you are feeling comfortable, allow the breath to become pelvic breathing
- Continue for 2 – 3 minutes, repeat on the other side.
- As you try the other side you might ask yourself, “How does this feel compared to the other side?”
Return to your seated position for another two minutes of pelvic breathing.
Lastly, repeat your body scan and self check in.
Breanna, of Yoga Therapy with Breanna, is a Yoga Therapist.
Breanna finds inspiration from her yoga practice to engage deeply with the world as she lives her daily life. Yoga has allowed Breanna to embrace and truly inhabit her own body with love and compassion.
Breanna believes strongly in the power of movement and breath on the physical, mental-emotional body. Breanna’s classes are known for creating a space of non-judgement and deep relaxation. Her classes are centred around uplifting mindful movement and opportunities to explores one’s own intuitive movement to nourish all aspects of one’s self.
No Comments